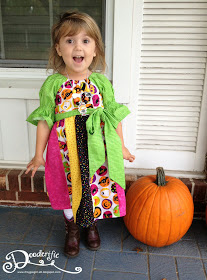
This dress is pretty much made according to the pattern, with the 3/4 sleeves, no bottom ruffle and optional sash. The only change I'd make is to alternate the halloween fabric every other on the strips instead of every two or three strips...I just don't think you can see enough of the halloween just by glancing at it. I would have done other halloween fabrics but none seemed to match the circle fabric (it has bats, ghosts, "boo", witch hats, pumpkins, and candy corn in the various colored circles) very well, and I just fell in love with it.
I'm really thinking about making a similar dress for Thanksgiving, Christmas and Valentines day!
You can buy this pattern from Create Kids Couture here:
- Girls sizes 6-12 months to size 8
My Blogs
▼
Wednesday, October 23, 2013
Tuesday, October 01, 2013
Willow Wrap Jacket (Create Kids Couture)
I made this pattern in a sew-along on Facebook with the designer, Create Kids Couture. Each day of the sew-along there is an assignment and you post a photo of your progress.
I chose a thin corduroy for the outer layer and flannel for the lining. The sash and ruffle is also flannel, but next time I'll use a cotton for those because I don't care for the look of flannel after it starts to get worn and washed. It's nice and soft for the lining though so I'd keep it there. The pattern calls for a sash closure, but knowing my 3 year old, I knew that was not practical, so I sewed the sash onto the jacket (next time I'll do this before sewing the jacket outer to the lining). Then I added a 1" snap to hold the jacket closed. I am going to add a half inch snap toward the top to keep it closed up there too when my cuckoo kiddo is running around.
This was a really simple pattern, and came together nicely - and it was so fun to watch everyone making the jacket together and posting their photos!
I am so in love with this pattern! So much so that I am going to make one for myself (yes the pattern comes in girls, tweens and adult sizes!). I'm almost anxious for fall temps to get here so she can wear it!
You can buy this pattern from Create Kids Couture here:
- Girls sizes 6-12 months to size 8
- Tweens sizes 7/8 to 15/16
- Womens sizes XS to XL
 |
| Day 1: Cutting |
 |
| Day 2: Bodices - outer and lining |
 |
| Day 3: Skirt and Gathering |
 |
| Day 4: Bodice Ruffle |
 |
| Completed Jacket |
You can buy this pattern from Create Kids Couture here:
- Girls sizes 6-12 months to size 8
- Tweens sizes 7/8 to 15/16
- Womens sizes XS to XL
Saturday, September 14, 2013
Kirby Plush Toy
 |
| Plush Kirby |
My daughter recently became obsessed with Kirby from Nintendo and kept asking for a plush Kirby. A quick google search revealed a tutorial by Seremeres Blog. My kirby plush is made from this pattern (but I didn't read it carefully and didn't do the arms quite right).
 |
| Kirby wearing the hats |
Well, just a plush Kirby wasn't enough for my daughter, and she wanted his "copy ability" hats. Kirby as quite a few abilities, and since I was also using the Kirby as the "mascot" for my St. Louis Challenge team, I picked some of the easier ones to make first. These headbands are designed with elastic in the back so they fit Kirby's head, as well as both my 3 year olds head and an adults head as well (except for the hammer Kirby one, but it's made of yarn so easy enough to make 2 separate headbands). I didn't use a pattern for these, just made these myself.
 |
| close up of fighter hat |
 |
| close up of hammer hat |
 |
| close up of leaf hat |
 |
| St. Louis Challenge Team |
Thursday, September 05, 2013
Grace Ruffle Dress (Funktional Threads)
 |
| Front and back views |
I just recently completed a sew-along on the Funktional Threads facebook group. I've been wanting to try a mixed fabric print style dress for awhile, but honestly wasn't confident that I'd pick fabrics that looked good together! I spent quite awhile at JoAnn Fabric trying to match the colors and get a good mix of fabric styles - striped, polka-dots, damask. And, as many veteran "mixed print" sewers warned me, I am now hooked on mixing prints - I've got a halloween dress in the works with 5 different fabrics as well!
 |
| My fabrics |
It took a good two hours to cut out all the pieces - this dress was more complicated than I realized at first! I spent a week total from start to finish working on the dress. I even learned a new technique for ruffling that is AMAZING - I will never go back to the baste stitch technique. Here's the tutorial I used to learn the clear-elastic ruffle technique.
 |
| Apron Ruffle using Clear-Elastic Technique |
 |
| Click the image to purchase the pattern |


